How to Enable/Disable UAC Using Msconfig Tool in Vista
Here is a small but useful guide that shows you how to enable/disable UAC (User Account Control) in Vista by using msconfig tool. Generally, we use msconfig tool to change boot options, remove startup applications & services, and other boot related functions.
Many users don’t the fact that even msconfig tool can be used to enable/disable UAC easily. Though we can change UAC settings in the User Accounts, using msconfig is very simple and straight-forward. Just follow the procedure below to enable/disable UAC via msconfig.
1. In the Start menu search field, type in msconfig and hit enter to open System Configuration dialog box.
2. Click Continue for the UAC prompt (If you see any!).
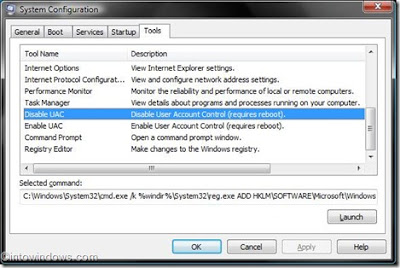
3. Move to Tools tab.
4. Select the tool labeled Disable UAC (or Enable UAC) and click the Launch button.

5. Once you click the Launch button, a command prompt window will appear displaying the successful message. Exit the Command Prompt and reboot your machine to apply the change.
6. Done!
Many users don’t the fact that even msconfig tool can be used to enable/disable UAC easily. Though we can change UAC settings in the User Accounts, using msconfig is very simple and straight-forward. Just follow the procedure below to enable/disable UAC via msconfig.
1. In the Start menu search field, type in msconfig and hit enter to open System Configuration dialog box.
2. Click Continue for the UAC prompt (If you see any!).
3. Move to Tools tab.
4. Select the tool labeled Disable UAC (or Enable UAC) and click the Launch button.

5. Once you click the Launch button, a command prompt window will appear displaying the successful message. Exit the Command Prompt and reboot your machine to apply the change.
6. Done!


Comments